Taking good eclipse photos is harder than it looks. The last Great American Eclipse, on Aug. 21, 2017, was photographed by hundreds of thousands of people — and many of them were probably disappointed in their results. Overexposure, blurriness, and camera malfunctions are all concerns if you aren’t prepared. Here are some tips you can follow that might help you take better pictures of eclipses this month and beyond.
1. Select Your Equipment
Decide what optics you’ll be shooting through. It could be a camera lens or the tube of a telescope. Also decide what you’ll be shooting with: a digital single-lens reflex camera (DSLR) or mirrorless camera, a point-and-shoot camera, or your cellphone. Most importantly, you’ll need an approved solar filter that goes over the front of your optics.
2. Practice As Much As You Can
Don’t take your first pictures of the Sun on eclipse day. Take some test shots first. To do that, go outside on a sunny day, aim your filtered camera at the Sun, and shoot. (NOTE: When not looking through your filtered optics, wear solar glasses to protect your eyes as you look toward the Sun.) Set your lens to a fixed aperture — somewhere between f/8 and f/16 — and take a range of exposures. Examine the images and narrow them down to the best two or three. That’s when to look at the EXIF data, where all the shooting details will be. Remember, the Sun remains bright throughout the eclipse, so you won’t have to change exposure times until the disk is a thin crescent. At that point, add two more exposure stops.
3. Decide What You Want To Shoot
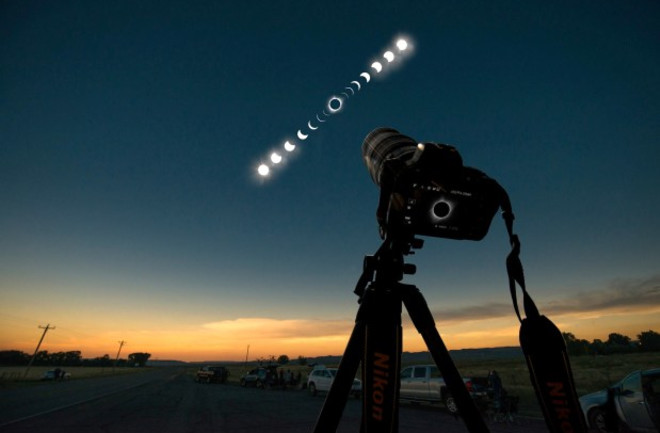
There are many ways to frame a shot of the eclipse. Look through back issues of Astronomy or check out the Picture of the Day images on Astronomy.com for inspiration. You could mount your camera on a tripod and take a single shot during totality. Or you could take a sequence that shows the progression. To do this, aim your camera at the Sun’s position at mideclipse and shoot about once every five minutes. You can later combine these shots into one picture using various software. If you want to take close-up shots of the whole eclipse or starting just a few minutes before totality, the best way is to attach your camera to a motorized telescope mount.
4. Bring Extra Batteries
Do this so your equipment won’t shut down. And make sure all devices are fully charged in advance. You can never be too careful.
5. Check Your Camera’s Memory Card
Make sure the memory card in your camera has at least twice the space you think you’ll need to photograph the eclipse.
6. Arrive Well Before The Event Starts
Don’t scramble to set up minutes before the eclipse. Beat the crowd by getting there early. You can pick out a prime spot, set up your equipment, test it, and deal with any problems without stressing over time.
7. Use An Approved Solar Filter
As should be clear from how often it’s repeated, viewing and photographing the eclipse must only be done through an approved solar filter. For solar glasses, look for the ISO 12312-2 rating — the international standard for direct solar viewing. For your eyes to be safe when viewing through a filtered camera, stricter standards apply. The filter — which goes on the front of your optics — must reduce the visible light by a factor of 128,000.
8. Secure Your Filter
Most solar filters made for telescopes fit tightly on the front of the tube. Camera lenses, however, come in a wider variety of sizes. If your filter is even slightly loose, secure it with painter’s tape, which removes easily and will not leave residue.
9. No Filter During Totality
The Sun’s disk outshines the corona by a million times. That’s why we never see the corona except during totality, when it is the only visible light. To photograph this event, you’ll need to remove the filter from your lens (or telescope) once totality occurs. Also, the corona is really bright close to the Sun’s edge but fainter far from the Sun. Usually, at a distance of about 1 solar diameter, your eyes won’t see the corona, but cameras will. So bracket your exposures during totality across a wide range of shutter speeds to capture the full dynamic range of the scene.
10. Get A Camera-To-Scope Adapter
If you’re coupling your camera’s body to a telescope, you’ll need both a T-ring and a T-adapter. The T-adapter screws into the camera-specific T-ring. The adapter’s other side is a 1¼-inch-diameter tube that slides into your telescope’s focuser just like an eyepiece, making your scope a giant telephoto lens.
11. Use A Remote Shutter Release
Why take the risk of possibly moving your camera and blurring your photo just by hitting the shutter? Devices that trip the shutter for you are small, easy to use, wireless, and inexpensive.
12. Focus Is Critical
Turn off your lens’ autofocus. That feature doesn’t work well when aimed at blue skies, nor in low-light conditions. Also, most camera lenses can now focus past infinity, so you can’t just turn the focuser all the way until it stops. Focus by aiming at a distant earthly object. Then don’t touch the focus ring again — or secure it with painter’s tape, as mentioned in No. 8.
13. Prep During First Contact
The entire total eclipse lasts 2 hours 19 minutes or more in the U.S., but a lot of that time is a slow build-up. Remember, this event is all about totality. If you’re concentrating on capturing those three to four minutes, take the hour after first contact to do your final check to see that everything works. Then rehearse your plan a few more times.
14. Camera/Lens Field Of View
Many DSLRs exist today, and they all accept a variety of lenses. Plus, not all of them have the same size sensors (chips). Here is an easy way to figure out a lens’ field of view (FOV) on your camera: FOV = 2 * arctan (0.5 * s/f) * 57.3. In this equation, s stands for sensor dimension in millimeters and f is the focal length of the lens in millimeters. Note that this formula is for just one dimension (width or height) of your chip. If you want the FOV in both dimensions, do this calculation twice. (Refer to “Choosing a camera for eclipses,” in the December 2023 issue, for more details.)
15. A Telescope’s Field Of View
But what if you’ll be attaching your camera to a telescope? The calculation is the same. Use the formula in No. 14, but insert your scope’s focal length for f. You’ll find it on the tube, on the ring that secures the front optic, or in your instruction manual.
16. The Corona’s Size
If you’re photographing totality, the Sun’s disk is just the beginning. Between second and third contacts, it disappears. What will be visible is the corona, which stretches between 1 and 1.5 solar diameters from the Sun’s edge. A corona measuring 1 solar diameter will have a diameter of 2.5°. A 1.5-solar-diameter corona will span 3.5°.
17. The Sun’s Size On Your Chip
After you figure out the FOV of your camera and lens combination, it’s simple to calculate how much of your camera’s sensor the Sun will cover. Let’s say it has an FOV of 6° in the horizontal direction. The Sun and Moon both have an angular diameter of 0.5°. So, the Sun’s width on your image will be 0.5 divided by 6, or 8.3 percent of the FOV.
18. Your Lens’ Focal Length
To capture the Sun during the partial phases, make sure you don’t pick a lens or telescope that restricts the view to less than 0.5° in the vertical dimension. Increase this to 3° or even a bit more if you want to photograph the corona.
19. Avoid Small F-Ratios
If you’re using a zoom lens or a teleconverter, the image won’t be sharp if you shoot at f/1.4. Instead, pick an f-ratio from f/8 to f/11 to get better images.
20. Use A Tripod
The best eclipse photography is never handheld. While image stabilization sounds good, no photographer should trust it for capturing eclipses. You have two choices: Use a standard tripod or attach your camera to a telescope mount (with or without the scope) that sits on a tripod.
21. Camera Write Speed
How fast you can take pictures depends on your camera-to-memory-card write speed. See how fast your camera will let you take pictures by checking your SD card, which often has the write speed in megabytes per second (MB/s) listed on the front. The latest cameras have write speeds at a minimum of 10 MB/s, while older DSLRs and point-and-shoot cameras are slower.
22. Consider An Intervalometer
An intervalometer lets you take time-lapse photos. If you plan to capture close-up images during the whole eclipse, this device will let you take exposures at any interval you choose. Search online and you’ll find a variety of intervalometers, also called timer remote controls, for many Canon and Nikon DSLRs. Newer cameras often have built-in intervalometers — sometimes as part of time-lapse functions — or may be controlled remotely via a smartphone.
23. Totality Seems Brief
As amateur astronomer Norm Sperling wrote in an essay titled “Sperling’s Eight-Second Law” in the August 1980 issue of Astronomy, “Everyone who sees a total solar eclipse remembers it forever … the curdling doom of the onrushing umbra, the otherworldly pink prominences, and the ethereal pearly corona. And incredibly soon, totality terminates. Then it hits you: ‘It was supposed to last a few minutes — but that couldn’t have been true. It only seemed to last eight seconds!’ ” I hope you get his point. If you encounter a problem that takes more than a few seconds to fix, stop! Forget about photographing the eclipse and instead just enjoy the view.
24. Photograph Everything
Bring a second camera (or use the camera in your phone) to make sure you can chronicle what’s happening around you before and after the eclipse. Doing so won’t ruin your experience and will document the activities of your family, friends, or astronomy club.
25. Be Euick About Processing Your Shots
Processing your photos quickly isn’t so much advice for this eclipse but rather advice for any images, especially ones you have put so much work into. Don’t let those images just sit on your computer or memory card and get forgotten about. Go through each one as soon as you can. And if you want to, email your best ones to readergallery@astronomy.com. Even if you aren’t interested in getting the images published, processing them quickly will also allow you to share the excitement with the special people around you.
This article was originally published on Astronomy.com and updated by Discover Staff. Read the original here.